"The Rich Text Editor (RTE) provides authors with a wide range of functionality for editing their textual content; providing them with icons, selection boxes and menus for a WYSIWYG experience. These can be individually activated, deactivated, or configured for your installation-specific text component(s)."
Since the RTE has so many options and potential variations, it makes sens to explore it in more depth.
An AEM Master should be able to user, configure and customise the RTE, but the AEM Master should also understand the limitation of the RTE.
This Sortie is designed to provide that skill via a few basic steps
Prerequisites
- Running AEM author instance (6.2 or 6.3)
- Dev tools installed (Maven, Git, Eclipse)
- AEM Tools for Eclipse installed
Note: While writing this Sortie I used AEM 6.3 with Maven Archetype 11, so if you're using different versions your mileage may vary)
Steps
Step 1: Get your Git on
The intention with the AEM BootCamp is to follow a standard development process centred around the GitHub repository.- Start by cloning the Sortie repository to you local machine (URL: https://github.com/AEMBootCamp/Sortie-0001-RTE)
- I'd suggest you use a standardised folder on your machine to contain all AEM BootCamp code. For example ~/Repos/AEMBootCamp. I'll refer to this folder as [AEM_BOOTCAMP_HOME]
- It would probably be best if you cloned the repo at [AEM_BOOTCAMP_HOME]/Sortie-0001-RTE, but feel free to use another location if you so feel. I'll refer to this folder as [REPO_HOME]
- Once the repo is cloned, create your own branch.
- cd [REPO_HOME]
- git branch <yourname>
- git checkout <yourname>
- Then cd into the [REPO_HOME]/soldiers folder and create a folder for yourself (for example [REPO_HOME]/soldiers/greg)
- Now you can create an Eclipse workspace at the [REPO_HOME] level
Make sure you complete the sortie in this folder. Remember to commit regularly and push your code when you're done (or when you want others to review it)
Step 2: Create a basic site to be used in this Sortie
To be able to play with the RTE, we need an AEM page to add the component to. And to have a page, we need a site.So let's start by creating a brand new site using Maven ArcheType 10 or 11 (For details of how to do this, please follow the instruction provided at https://helpx.adobe.com/experience-manager/using/first-arch10.html)
Here are the steps I followed (You might choose another path):
- In eclipse: File > New > Other > AEM > AEM Sample Multi-Module Project
- Location: /home/gregf/Repos/AEMBootCamp/Sortie-0001-RTE/soldiers/greg
- Archetype = aem-project-archetype : 11
- Name = sortie1-rte
- Group Id = org.aembootcamp.rte
- Artifact Id = sortie1-rte
- Don't deploy on a server
- Finish
- Note: I got an issue at this step (See https://github.com/AEMBootCamp/Sortie-0001-RTE/issues/3). However, the project was created successfully
- Make sure you have a running Author server on port 4502
- mvn clean install -PautoInstallPackage
- Note: When I was using AEM 6.3 and archetype 11 I got an issue here (See issue and resolution at https://github.com/AEMBootCamp/Sortie-0001-RTE/issues/2)
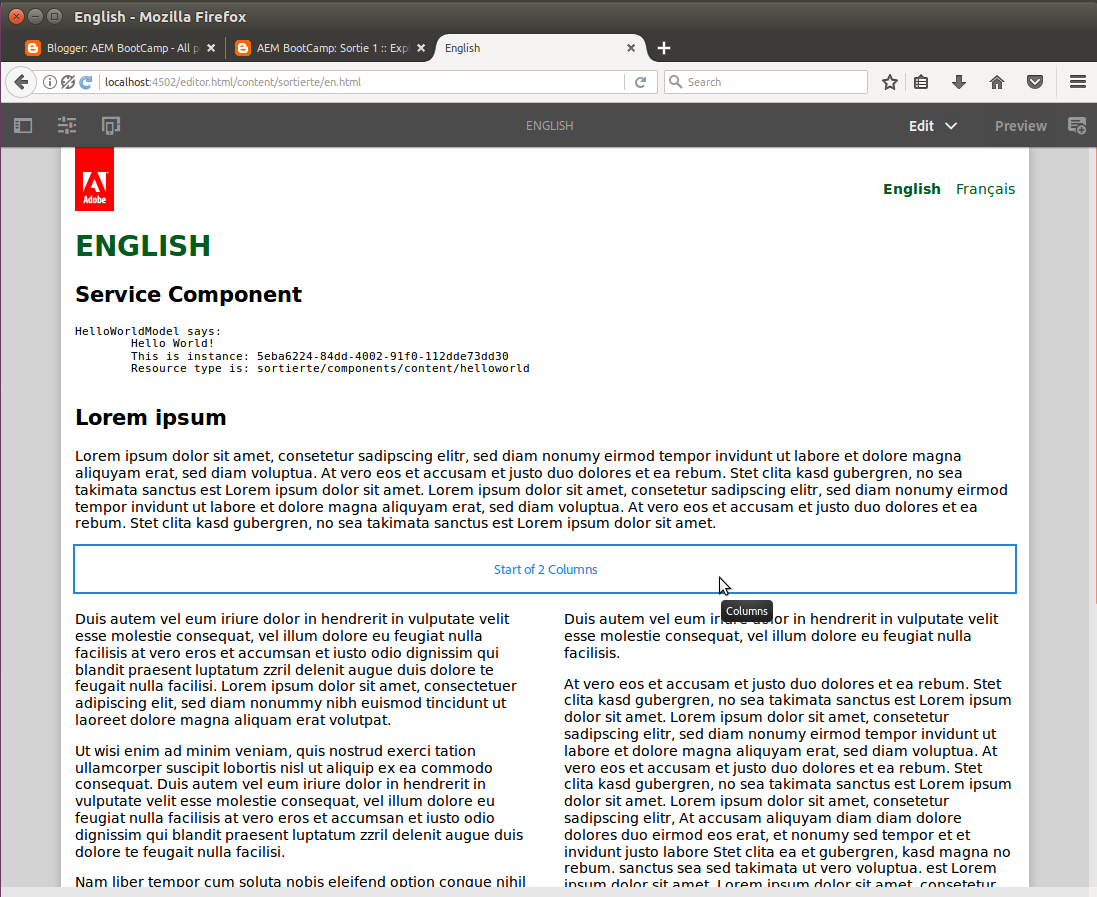
Make sure this page runs as expected, i.e. in Edit mode the screen should look like this:
Note: I am getting intermittent issues here related to not being able to find the sling model used by the service. See https://github.com/AEMBootCamp/Sortie-0001-RTE/issues/4
Step 3: Understand the RTE from an Author's perspective:
Now you can start playing with the author capabilities to understand what is available.First read:
Note that:
- The RTE is used for three OOTB components (Text, Table, Text & Image)
- While doing in-line editing very few options are available to the author
- When you switch to full-screen mode a few additional option are made available, like ordered and unordered lists
- The features available in the RTE is dependent on how it is configured, so we'll need to move on to configurations next
- Open http://localhost:4502/editor.html/content/sortierte/en.html in Edit mode
- Remove all the pre-built components from the page, leaving just the top-most text component (The one starting with Lorem Ipsum)
- When you're done the page should look like:

Now let's use the default options available in the RTE to edit the text.
- Add bold, italic and underlined text
- Add a link URL
- Add some left-aligned, right-aligned and centre-aligned text
- Add an unordered list
- Add an ordered list
- When you're done you page should look something like this (shown here in Preview mode)

Step 4: Configuring the RTE
In the previous section we played with some of the default functionality provided by the RTE. However, if we want to make different functionality available in the RTE, plugins need to be added and configured. The available plugins (listed by Plugin ID) are:- edit
- findreplace
- format
- image
- keys
- justify
- lists
- misctools
- paraformat
- spellcheck
- styles
- subsuperscript
- table
- undo
First read:
Complete the tutorial at: https://helpx.adobe.com/experience-manager/using/configure-touchui-rte.html
- Note; These is some dodgyness in this tutorial that you should keep an eye out for. In particular:
- The sling:resourceType of the template is incorrect. It should be "touchRTE/components/page/templateRTE"
- There is not instruction to change the componentGroup for the new component. So it is added to the General group
- You must remember to make the component accessible to author's in Design mode, else it isn't available in the side panel
Now that you've followed a basic tutorial on the RTE, use your knowledge to build a customized RTE for the sortie1-rte project:
- I'm building it directly in CRXDE, but amending the tutorial details according to my needs
- I have Eclipse set up to synchronise with CRX using vault
- My component is based on HTL, not JSP
- I'm creating a custom component that customizes the RTE to include a findreplace plugin and spellcheck plugin
Final Checkpoint
Once you've completed step 4, you should be in a position to give your project to another developer to use. You can test this locally by:- Deleting the sortie1-rte from your local AEM instance
- Rebuilding from source using mvn clean install -PautoInstallPackage
- If you now open the en page in Edit mode, the author should have access to your text component with customized RTE plugins.
References:
Web Links:- https://docs.adobe.com/docs/en/aem/6-3/author/page-authoring/rich-text-editor.html
- https://docs.adobe.com/docs/en/aem/6-3/administer/operations/page-authoring/rich-text-editor.html
- https://helpx.adobe.com/experience-manager/using/configure-touchui-rte.html
- http://www.aemcq5tutorials.com/tutorials/configure-rte-plugin-in-touch-ui/
- http://experience-aem.blogspot.co.za/2017/06/aem-63-touch-ui-rte-rich-text-editor-color-picker-plugin-inplace-dialog-edit.html
- https://forums.adobe.com/thread/2343206
- https://github.com/Adobe-Marketing-Cloud/aem-project-archetype/issues/94
- http://www.aemcq5tutorials.com/tutorials/develop-component-touch-ui/
- http://www.aemcq5tutorials.com/tutorials/display-components-touch-ui/
Slack Channel:
- sortie1-rte
Issues and resolutions during this sortie:
Finding and resolving issues is a big part of the learning experience. The AEM BootCamp uses GitHub for logging and managing issues.The following issues were experienced by soldiers while completing the Sortie:
- [RESOLVED] AEM 6.3 Admin Password Doesn't work
- [RESOLVED] Sightly issue when creating project in Eclipse with AEM tools plugin
- [RESOLVED] autoInstallPackage doesn't seem to work with Archetype 11
- Sling Models Exception when viewing archetype sample page on AEM server
No comments:
Post a Comment